The General Ledger (GL) module is part of the Financial series in Dynamics GP and the menu choices for it will start with Financial. The SQL tables for the General Ledger module will begin with GL. There are three setup steps for the GL module:
General Ledger setup
Categories
Segments
General Ledger setup
To open the General Ledger Setup window, navigate to Microsoft Dynamics GP | Tools | Setup | Financial | General Ledger.
This window controls the next journal entry number, the Retained
Earnings account used for closing the General Ledger, history settings,
and options allowed for GL transactions. These settings can be changed
at any time; however, as most users should not have access to setup
windows, it is best to choose settings and defaults that will be most
helpful to the majority of the Dynamics GP users. The following is an
explanation of the settings on the General Ledger Setup window:
Next Journal Entry: The system
default is to start with 1, however, this can be changed to any other
number you prefer. Journal entries must have unique numbers in Dynamics
GP, you cannot reuse numbers unless you delete transaction history.
Next Budget Journal Entry: Dynamics
GP 2010 is the first version to offer the ability to enter budget
transactions, allowing updates to budgets while keeping track of the
changes. This setting determines the next budget journal entry number.
Display: This controls the default display on any General Ledger inquiry window that offers a choice between Net Change and Period Balances. The display can always be changed on each individual window, so this setting is not critical.
Retained Earnings: There are two
options in Dynamics GP—close all Profit & Loss accounts to one
Retained Earnings account or close to multiple Retained Earnings
accounts, one per division. The latter is not very common and will
require you to select a segment of your GL account number to identify
your divisions. You will need to have a Retained Earnings account set up
for each possible division if choosing this option.
Maintain History: It is recommended to keep all history, so select all three history options.
Allow:
Posting to History: This box must be
checked prior to posting transactions to the last historical year. To
prevent mistakes, it is recommended to keep this unchecked and change it
only when needed.
Deletion of Saved Transactions: It is
recommended to uncheck this option to prevent users from inadvertently
deleting saved GL transactions. A more detailed discussion and
explanation of the need for this can be found in the following blog
post: http://victoriayudin.com/2009/04/11/where-did-my-transaction-go/.
Voiding/Correcting of Subsidiary Transactions:
This setting prevents users from voiding or correcting GL transactions
that originated in a subledger. The scope of this is fairly limited, as a
user will still be able to enter a manual GL entry to re-class a
subledger transaction. However, this may help somewhat mitigate
subledger reconciliation issues.
Back Out of Intercompany Transactions:
If the Intercompany module is used to allow automatic posting from one
Dynamics GP company to another, this setting can prevent users from
backing out any intercompany GL transactions. Backing out an
intercompany transaction in one company will not automatically back out
the related transaction in the other company, so disallowing this can
help lower the chance of reconciliation problems for intercompany
accounts.
Update Accelerator Information: If
you are using Advanced Financial Analysis, it is recommended to mark
this option if you have frequent changes to the financial report
layouts.
Reporting Ledgers: Another new feature in Dynamics GP 2010 is the ability to set up multiple reporting ledgers to meet compliance standards for IFRS (International Financial Reporting Standards). When Allow is checked, Reporting Ledgers can be added, and when entering a GL transaction a reporting ledger will need to be selected.
|
Once Allow is selected under Reporting Ledgers, it cannot be unchecked. Make sure this is a setting you want to enable before selecting Allow.
|
|
User-Defined Field Labels: These are the labels for the four user-defined fields on the Account Maintenance window (Cards | Financial | Account).
The following is an example of the General Ledger Setup window with the typical setup options:
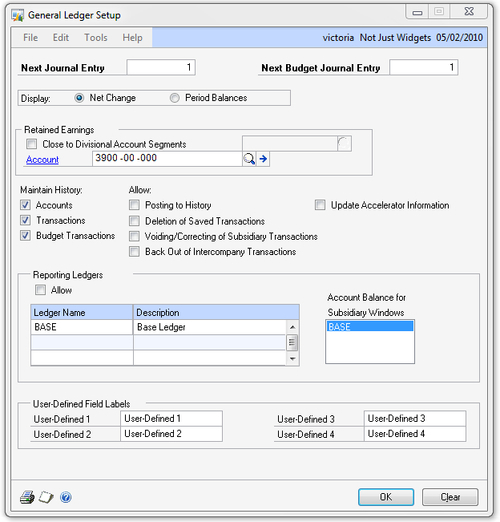
Changes made on the General Ledger Setup window will not be saved until you click the OK button. The Clear button will clear any changes you have made to this window prior to saving them.
Categories
General Ledger account categories in Dynamics GP help
identify the function or financial reporting section for each GL
account. Categories are used for automatic creation of some of the Home Page
metrics in Dynamics GP and can sometimes be helpful during financial
report creation. However, if all your GL accounts were created with the
same category it would not break any basic functionality within Dynamics
GP.
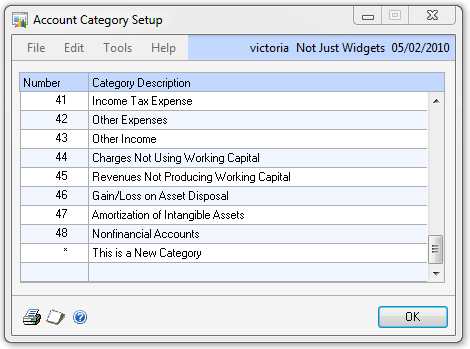
You can also create your own categories or rename existing categories on the Account Category Setup window:
Navigate to Microsoft Dynamics GP | Tools | Setup | Financial | Category.
To rename an existing category, find it in the list and type over the Category Description.
To create a new category, scroll to the end of the list and type in a new Category Description on the first blank line. The Number for all new categories will show as a star (*). However, this will not cause any problems in using them:
If you have multiple Dynamics GP companies, it is
recommended to have the same list of account categories in each company,
so that there is no confusion during reporting or errors during account
creation or imports.
Segments
When setting up your Dynamics GP company account
format, you gave unique names to each of your General Ledger account
segments. Some of these may have a predefined list of values and names.
For example, if one of your segments is Department, your list of
departments may look like the following:
|
Department number
|
Department name
|
|---|
|
00
|
Corporate/Overhead
|
|
10
|
Administrative
|
|
20
|
Sales
|
|
30
|
Marketing
|
|
40
|
Information Technology
|
|
50
|
Customer Service/Support
|
When account numbers are entered into Dynamics GP,
the unique value for each segment will be identified by the system and
you can, optionally, predefine a name for each unique segment value.
There are four benefits to naming your segments:
Dynamics GP reporting and lookups:
Some reports and lookups in Dynamics GP can be filtered and sorted by GL
account segments. If the segments have meaningful names, it is easier
to use these filters without having to consult additional documentation.
A few examples of this are the GL Trial Balance reports and the Budget
Wizard for Excel.
Custom reports: When creating custom
reports, segment names assigned in Dynamics GP can be referenced instead
of having to hard code names into reports, thus making reports more
dynamic.
Creation of new GL accounts: If you
have not disabled (or have re-enabled) Dynamics GP's auto-naming
functionality, then while creating new GL accounts, the system will
automatically populate the appropriate segment names into the account
name, thereby possibly speeding up new account creation.
Financial reports: If you create
departmental or divisional FRx reports, FRx can automatically bring in
the names assigned to each segment in Dynamics GP. For one or two
reports this might not make a difference but, as more reports are added,
this can significantly simplify and speed up report creation.
To enter names for your GL account segments, navigate to Microsoft Dynamics GP | Tools | Setup | Financial | Segment. On the Account Segment Setup window, select the Segment ID, choose the segment Number, and type in a Description:

The segment names can be changed at any time, but
segment names can only be entered for existing segments, so this setup
cannot be performed prior to entering your General Ledger Chart of
Accounts into Dynamics GP.
Account currencies
Dynamics GP allows you to control the GL accounts
that can be used with each currency you have enabled. By default, all
accounts will be accessible to your functional currency. To allow
posting to your GL accounts using currencies other than your functional
currency, you will need to set up each account with the currencies
allowed to post to it. To do this, perform the following steps:
Navigate to Cards | Financial | Account Currencies to open the Select Account Currencies window.
Select the GL Account and the Currency IDs from the available list.
Select whether or not you wish to Revalue Account when the revaluation process is performed in Dynamics GP. If you decide to revalue, then choose: